HTML for greens
In this chapter you will learn...
HTML course for complete beginners. Write your own website even in one day and get it on the Internet for free. Creating a WWW site is really easy. You are invited!
 Let's get started HTML course!
Is website development really as difficult as they say?
- HTML editors
Which HTML editor to choose: Pajączek, CoreEditor, Bluefish, Brackets, PSPad, gedit, Kate, Quanta Plus, SCREEM, Smultron?
- Document structure
What does a typical HTML document look like? What are subpages?
- Entering text
How do you enter text on Web pages? What are the rules for correct typing of punctuation marks in computer text?
- Tags
What are HTML tags?
- Line break
How do you move text to the next line in an HTML document?
- Paragraph
How to arrange text on the screen? How to add a new paragraph? How to center or align text? What are HTML attributes?
- Bold
How do I bold (embolden) text on a Web page?
- Italic
How to italicize text on a web page (italics)?
- Underline
How do you underline text on a Web page?
- Font size
How do I change the font size on a web page?
- Font color
How do I change the font color on a web page?
- Font family
How do I change the font type on a Web page?
- Combining parameters
How do you change the appearance of text on a web page?
- Background and text color
How do I change the background color and text color on a web page?
- Inserting image
How do I insert an image (graphic, photo) into a Web page?
- Image alignment
How do I determine the alignment of an image (graphic, photo) on a Web page?
- Centering image
How do I position an image (graphic, photo) or other elements in the center of the screen (centering)?
- Subpage link
What are links (hyperlinks, hypertext links) used for?
- Web address link
How to insert a link (hyperlink, hypertext link) in a Web page?
- Email link
How to insert an email address on a web page?
- Image link
How to insert an image (graphic) link (hyperlink, hypertext reference), i.e. a clickable button, on a Web page?
- How to make good website
What to avoid so that your Web site does not scare away Internet users?
- Revision
HTML
- Tutorial
HTML
Let's get started HTML course!
Is website development really as difficult as they say?
I see that you are "green"... but don't worry. If you really want to "change color," read the text below. It will help you create your first web page, even in just one day. If you think that writing web pages in HTML is like "black magic" and the webpage itself is some mysterious and very complicated document, you're mistaken. Writing a simple web page is easier than you think. So, stop wasting time on excuses like, I won't learn anything!
and similar, because it's not true. Start reading better.
I have only one request: try to read the entire content on this page as carefully and sequentially as possible. If you skip a point or read it too quickly, it may cause you not to understand the following parts.
Sources
The description here has been developed based on the following specifications:
- HTML 4.01 Specification
- XHTML 1.0 The Extensible HyperText Markup Language
- XHTML 1.1 - Module-based XHTML
- HTML5 - A vocabulary and associated APIs for HTML and XHTML
- Differences from HTML4
- Unicode Character Database
HTML editors
Which HTML editor to choose: Pajączek, CoreEditor, Bluefish, Brackets, PSPad, gedit, Kate, Quanta Plus, SCREEM, Smultron?
What is needed to create a website? Theoretically, it can be any text editor, and of course, good intentions. HTML, which stands for Hypertext Markup Language, is simply a text file where you enter all the commands for formatting text, inserting graphics, and more. However, writing a page in a plain text editor would be very cumbersome. That's why many specialized editors have been created to make your work easier, faster, and more enjoyable. Below, you will find a list of popular HTML editors (in order of licensing and alphabetically). Some of the information has been taken from the manufacturers' websites.
Windows
- Pajączek (shareware - paid)
- The most well-known Polish HTML editor, developed for years. It offers broad support for the latest internet technologies, including HTML, XHTML, XML, PHP, JavaScript, VBScript, Perl, MathML, SVG, SMIL, P3P, ASP, and more. This support applies not only to easier editing of source files in these languages but also offers contextual documentation for selected language commands, server browsing, and dynamic code execution, which relieves the need to remember language commands.
- CoreEditor (paid - DEMO version available)
- A more affordable competitor to Pajączek, a complete rewrite of the free EdHTML. It performs very well as an editor for those programming in Pascal, Assembler, Delphi, C, Java, etc. Nevertheless, the emphasis is on support for technologies such as xHTML, CSS, PHP, JavaScript, and MySQL.
- Bluefish (free) ★★★☆☆
- A fast and lightweight editor for webmaster-programmers. It supports HTML, PHP, C, Java, JavaScript, JSP, SQL, XML, Python, Perl, CSS, ColdFusion, Pascal. It includes HTML tag wizards, especially for page structure, tables, frames, photo albums, and more. It automatically closes tags. It has a built-in search and replace tool for multiple files simultaneously and a tag and function documentation browser. It integrates with other applications. There are other language versiona available.
- Brackets (free) ★★★★☆
- A lightweight yet highly advanced and modern text editor designed primarily for webmasters. With live preview directly in the browser, you can verify the effects of changes in the HTML and CSS code in real time. It also supports the installation of many free extensions, which significantly expand the program's capabilities and better tailor it to your needs.
- PSPad (free) ★★★☆☆
- A fast and lightweight editor of Czech production, but it handles many other character encodings better than many native programs. It has other language versions, and please note that after installation, you should remove keyboard shortcuts that conflict with combinations for obtaining some diacritical characters in the program's settings! It supports languages such as HTML, XHTML, XML, CSS, JavaScript, PHP, C/C++, Java, Pascal, Perl, Python, RSS, SQL (MySQL, Interbase, MSSQL, Oracle, Sybase), Visual Basic, Assembler. It allows you to use document templates. It has a built-in document preview using system browser. It integrates with external programs, including a CSS editor. It supports plugin mechanisms. It includes a tool for compressing and decompressing HTML code and an extensive code explorer with a list of functions and elements in the edited document. It has an implemented bracket matching function, hints, and tag and function wizards that you can create and modify on your own. It supports macros. It includes a built-in file comparison tool and search and replace in multiple files at once. It also has a handy screen color picker, an ASCII character table, and spell checking.
Linux
- Bluefish (free) ★★★☆☆
- In addition to the Windows version (described above), this editor is also available for Linux.
- Brackets (free) ★★★★☆
- In addition to the Windows version (described above), this editor is also available for Linux.
- gedit (free) ★★★☆☆
- The official editor of the GNOME environment, known for its simplicity. It supports languages such as C, C++, Java, HTML, XML, Python, Perl. It automatically adds line indents and matches parentheses. It supports plugins, document statistics, integration with external applications, macros, and tag lists.
- Kate (free) ★★★☆☆
- Part of the KDE environment. A simplified version called KWrite is also available. It highlights syntax, matches parentheses, and automatically adds line indents. It supports auto-completion, as well as plugin mechanisms. It has a built-in spell checker and character encoding conversion.
- Quanta Plus (free)
- Part of the KDE environment. It highlights syntax for HTML, XHTML, XML, XSLT, CSS, JavaScript, Java, PHP, C/C++, C#, Python, Perl, SQL (MySQL, PostgreSQL), Assembler, ASP, JSP, Pascal. It matches parentheses and automatically closes tags while adding line indents. It includes various tag wizards, advanced auto-completion, hints, and automatic tag closing. It allows document preview in multiple modes and browsers (Konqueror, Firefox, Mozilla, Netscape, Opera, Lynx). It has tag and attribute editors and an advanced document structure explorer. Documentation for HTML, CSS, JavaScript, and PHP languages is included. It provides document and script templates. Supports plugins and integrates with other applications. Includes built-in tools for searching and replacing in multiple files simultaneously, file comparison, and link map editor. Supports CVS. Includes a built-in spell checker.
- SCREEM - Site CRreation and Editing EnvironMent (free)
- Includes a link explorer with the ability to check for dead links. Offers wizards, auto-completion, hints, and automatic tag closing. Supports document templates (interprets Dreamweaver program files). Supports CVS. Includes a built-in document structure explorer. Integrates with other applications. Includes a search and replace tool for multiple files simultaneously.
Mac OS X
- Smultron (paid)
- Offers syntax highlighting, creation of a snippet library for frequently used code blocks. It includes a feature explorer for functions in the edited document, supports autocomplete, and automatic tag closing. It comes with a built-in search and replace tool for multiple files at once. It supports AppleScript.
- Bluefish (free) ★★★☆☆
- In addition to the Windows version (described above), this editor is also available for Mac OS X.
- Brackets (free) ★★★★☆
- In addition to the Windows version (described above), this editor is also available for Mac OS X.
If you're unsure which HTML editor is right for you or prefer to search for a foreign-language program, see: HTML Editors Ranking (online). Additional descriptions and comparisons with download links can also be found on sites like DobreProgramy.pl or in the magazine Komputer Świat.
Choosing HTML editor
There are also graphic editors, known as WYSIWYG (What You See Is What You Get). An example is FrontPage, available in the Microsoft Office suite. You don't need to know HTML to use them because they allow you to create a webpage just like in a regular text editor, and they automatically generate the HTML code. However, there's no such thing as a free lunch (except maybe for this course :-)). These editors don't give you full control over the content of the page. While you can use various rich tools, learning all the capabilities of such an editor might take more time than learning the basics of HTML. Additionally, they generate "overhead" code, which increases the page size and makes it challenging to modify the page later using text editors. This can also lead to incorrect rendering in some popular web browsers. Moreover, there are cases where at least a basic knowledge of HTML is essential because graphic editors simply don't provide all the possibilities, or the result is not entirely as expected.
You can write a website in a regular text editor, but I absolutely do not recommend this method! First of all, it's easy to make typos in HTML commands, which can result in display errors on the page. Specialized HTML editors immediately alert you to these errors because each correct HTML command is usually displayed in a different color (this is called syntax highlighting) - incorrect commands don't change color. The content in a regular text editor looks uniform, so you won't notice errors.
If you use, for example, Windows Notepad, some language diacritic characters may be incorrectly saved - in a web browser, they will appear as "gibberish."
On different forums and discussion groups, you may come across somewhat playful comments like, A real webmaster doesn't use any additional editors because it's too easy
. Never believe in such tales! A true webmaster is characterized, in a nutshell, by knowledge, skills, and the ability to use the right tools, which significantly facilitate, and above all, speed up work. Additionally, for some inexplicable reason, beginners (and not only beginners) often claim that they don't use HTML editors because they want to learn HTML "properly." Such reasoning is entirely wrong! Using a regular pen, will we learn to write worse than if we did it with a goose feather and smudgy ink? On the contrary, the text written with a pen will look more aesthetic (no blots :-)). After all, spelling rules are always the same, regardless of the tool we use. Similarly, using text-based HTML editors will not make you learn HTML worse. It will only speed up your work and protect you from syntax errors, so you can get to know HTML even better. Most experienced webmasters-professionals use text-based HTML editors, and I strongly advise you to get one as soon as possible. The sooner you do it, the better for you.
For the above reasons, I strongly encourage you to install an HTML editor - preferably a freeware one. The offer is quite rich, and most of them provide more than enough features to create a great website.
Questions and Answers
What is HTML and what is it used for?
HTML is short for Hypertext Markup Language. It is a computer language used to create web pages. An HTML document is a text file in which you enter all the commands for text formatting, inserting graphics, and more.
How to edit a page in HTML?
To edit HTML pages, it's best to use a specialized editor. There are many free and paid HTML editors available for different operating systems: Windows, Linux, Mac OS X.
Which program to use for writing HTML code?
For writing HTML code, it's best to use a dedicated editor. There are many free and paid HTML editors available for different operating systems. For example: Pajączek, CoreEditor, Bluefish, Brackets, PSPad, gedit, Kate, Quanta Plus, SCREEM, Smultron.
Which HTML editor?
Brackets is one of the best HTML editors. It has a range of built-in features useful for creating web pages. It supports installing free extensions that can further enhance its capabilities. It is completely free and available in versions for every operating system.
How to convert text to HTML?
Many text editors, such as Microsoft Word, Open Office, or Libre Office, have the ability to convert a document to HTML code. To do this, simply use the menu: "File / Save As..." and then, in the "Save as type" field, choose "Web Page, Filtered (*.htm;*.html)" or "HTML Document (Writer) (*.html)" as appropriate. Finally, click the "Save" button. However, it should be noted that documents created in this way may take a long time to load and display incorrectly in some browsers, and they may be difficult to modify later. Therefore, it is recommended to use dedicated HTML editors for creating this type of documents.
How to open an HTML file in Word?
Text editors such as Microsoft Word, Open Office, or Libre Office allow you to directly open and edit HTML files. To do this, select the menu: "File / Open" and then locate the *.html or *.htm document on your disk and click the "Open" button. However, it's important to remember that modifying an HTML document in this way may result in longer loading times and incorrect display in some browsers. Therefore, it's recommended to use dedicated HTML editors for creating this type of documents.
Document structure
What does a typical HTML document look like? What are subpages?
Creating a website is similar to creating a regular text document. After launching an HTML editor, select the option from the menu: File/New. Now you can start writing your page. However, since an HTML document is not just a plain text file (it contains hypertext, embedded images, and must be displayed correctly on various operating systems worldwide), a special HTML document template has been designed, which should be followed.
Here's an example of what every HTML document should look like (there are other similar templates as well):
<!doctype html>
<html>
<head>
	<meta charset="utf-8">
	<meta name="description" content="Enter your page description here">
	<title>Enter your page title here</title>
</head>
<body>

Insert your page content here

</body>
</html>
ATTENTION!
The above template applies to the so-called source code. If you use a graphical editor (e.g., FrontPage), you must switch to the direct HTML source code editing mode. Additionally, if you use a plain text editor (e.g., Windows Notepad), some diacritic characters may be incorrectly encoded - they may appear as "question marks"! I strongly recommend using an HTML editor.
Most HTML editors automatically insert their own template when creating a new document - similar to the one shown above. If you prefer, you can modify it by changing the sections described below. However, it's a good idea to use the template presented in this section. In this case, all changes should be made directly in the HTML source code editing mode. If you have a graphical editor, you need to switch to it, while text editors usually only have this mode - in that case, no switching is necessary.
Tip for absolute beginners
You don't need to rewrite the entire text of the template every time you create a new page. In your web browser, simply move the mouse pointer to the beginning of the text (the pointer should change its shape) and click the left mouse button. While holding down the left button, drag the mouse to the end of the template text, then release the button - the text will be selected. Now press the Ctrl+C keys on your keyboard, which will copy the selected text to the system clipboard. Then, in your HTML editor, after opening a new file, simply press Ctrl+V, and the text from the clipboard will be pasted into the document.
If you are a more experienced computer user, such tips may seem funny to you. But please be understanding - everyone has to start somewhere. Remember your own beginnings...
Most of the text in the template above should not be changed. However, you should change the text that is highlighted - the relevant sections will be described in detail below.
The content between <head> and </head> (in the above template) is called the document header (meta content), while everything between <body> and </body> constitutes the so-called document body (actual content).
Now, let's clarify the most important lines.
- In place of the text: Enter your page description here, you should enter a written description of what is on your website. Search engines like Google use this information. The text you enter here will appear in the search results when your page is found by a search engine. If you leave this field empty, the search engine will display the first few lines it finds on the page. A catchy but not too long description can encourage internet users to visit your site! Each individual page in your website should have its own description, reflecting its content.
- Between
<title>and</title>(in place of the text: Enter your page title here), you should enter the title for your page. It can contain any text, but it's recommended not to be too long (just a few words at most). It should relate to the content of the page. The title appears in the browser's title bar (at the top of the program window) and in search engines after your page is found - that's why it should not be too long. A relevant title can also encourage users to check out your page! - Most importantly, in place of the text: Insert your page content here (between
<body>and</body>), you should enter the actual content of the page. It can be plain text that you want to display on the page. These are also the so-called control tags that determine the appearance of the document (which will be described later).
Under no circumstances should you omit the following line in the template above:
<meta charset="utf-8">What are subpages?
Practically all websites consist of a number of subpages, not just one very long main page. Each subpage is simply a separate file (with the extension *.html or *.htm), created in the same way as the main page (using the template shown above). For example, this website consists of the following subpages (see in the table of contents): "HTML for Beginners," "Header and Content," "Text," etc. This content organization makes it easier for users to navigate and prevents unnecessary loading of the entire website at once, which would likely take a very long time.
All subpages are usually saved in the same directory as individual files, or in different directories (if you want to organize them thematically). From one subpage, users can automatically navigate to others by clicking on the appropriate links (if you include them).
One more thing:
The file that serves as the main page (the homepage) must be named index.html or index.htm. Your website can consist of any number of subpages - each of them is a separate file, created in the same way as the main page. Other subpages can be named as you like, as long as they have the extension *.html or *.htm. However, using very long names can be inconvenient - especially when an internet user wants to go directly to one of your subpages by entering its address in the browser (each page has its own unique address that can be referenced).
- capital letters
- special characters, e.g., \ / : * ? " < > |
- spaces (if necessary, use an underscore "_")
- Diacritic3 characters (ą, ć, ę, ł, ń..., etc.)
If you don't follow these recommendations, it may turn out that after uploading the page to the Internet, such files will not load (even if everything is fine on your computer)!
In the following sections on this page, we'll provide descriptions of basic commands that can help you create your very first simple webpage. All of them should be placed between <body> and </body> (as part of the actual content of the page). If you want to add plain text to the page, you can simply type it directly without using any additional commands.
Questions and Answers
What is the structure of an HTML document?
An HTML document consists of a header section <head>...</head> and the actual body of the document <body>...</body>. In the header, you can include the title and description of the page. The body of the document contains text and other elements that will be displayed in the browser window.
What sections make up an HTML document?
An HTML document consists of a header section <head>...</head> and the body of the document <body>...</body>.
How to set diacritic characters in HTML?
To ensure correct display of diacritic characters, you should insert a character set declaration in the document's header: <meta charset="utf-8">. Additionally, it is necessary to use the appropriate HTML editor.
How to create subpages in HTML?
Websites typically consist of multiple subpages. To create a subpage, open any HTML editor and create a new file in the same way you would when creating the main page of the website. Then, input the appropriate content and save the file on your disk with the extension *.html or *.htm.
How to open an HTML file in a browser?
There are two ways to open an HTML file in a web browser. The first method is to use the appropriate keyboard shortcut in the web browser (in Windows, it would be Ctrl+O), and then, in the dialog box, locate the file on your disk and click the "Open" button. The second method is to locate the HTML file on your disk using the built-in file explorer in the operating system, and then double-click its name - this will open the file in the default web browser.
Entering text
How do you enter text on Web pages? What are the rules for correct typing of punctuation marks in computer text?
If you want to place plain text on a website, you can type it directly using your keyboard in the appropriate content area of the document (see: Document Structure). You don't need to use any additional commands for this. However, keep in mind that web browsers automatically wrap lines, so in the HTML editor, you can enter text as you like, for example:
This is plain text...
This is plain text...
This is plain text...
This is plain text...
You will see the following on the screen:
This is plain text... This is plain text... This is plain text...
In the editor, you can end a line (press Enter) wherever it's convenient for you. You also don't need to split words from one line to another using a hyphen:
This is plain text... This is plain text... This is pla-
in text...
You should type the highlighted word normally. The browser will automatically position it in the appropriate line.
Finally, here are a few practical tips that are easy to overlook but are genuinely helpful:
- Maintain proper spelling and style in the text! While typos can happen to anyone, glaring spelling errors, when frequent, can deter potential readers. If you struggle with spelling (like most Poles :-)), check your text in a computer dictionary (e.g., in Word). Many HTML editors have their dictionaries.
- Use punctuation, especially commas! If you don't use them, the text you write may be completely incomprehensible to readers. Remember to place commas between simple sentences that make up a longer compound sentence (a compound sentence contains several verbs, i.e., words that answer the question, "what does it do?").
Use periods - except at the end of the sentence - also after abbreviations (e.g.: "prof.", "eng."). Additionally, parentheses are often used to provide some side note (dashes can also be used in their place). - Separate different thematic sections of the text with new paragraphs. Very long "pure" text is not very comfortable to read.
You don't have to become a literary expert right away... unless you're creating a literary website ;-) I don't mean that the text on your site has to be grammatically and orthographically perfect. Let's not get paranoid. This is an HTML course, not a lesson in proper language spelling and writing. Certainly, you'll find errors on this site too - forgive me, I'm not a language language expert. As the famous quote goes: To err is human... and nothing human is alien to me
(you don't know who said that... I don't either :-)), but even minimal knowledge presented here can be helpful. The important thing is not to drive away visitors with unnecessary errors that can be easily avoided.
If you create your website "anyhow", it may suggest that the information on it is not reliable!
All of this has been a review, but there's something they don't usually teach in school and is essential when working with computer text - these are the rules for entering punctuation marks:
- Basic punctuation marks: period ("."), comma (","), exclamation mark ("!"), question mark ("?"), colon (":"), semicolon (";..."). Spacing is never placed before these marks! A space is added after them.
An exception is when several of these marks occur directly after each other - in that case, a space is added only after the last one.
A second exception applies to short multi-word abbreviations, where each abbreviated word ends with a period - in that case, a space is added only at the end of such an abbreviation (like "e.g." - exempli gratia).
Additionally, dates, times, and numbers should be noted that if there's a slash, comma, or colon within them, no space should be added after it (e.g.: "1410-07-15", "9:08", "12.5").
Also, note that individual periods within an ellipsis should not be separated by spaces, and if a sentence ends with an abbreviation ending with a period, an additional period is not added after it. No spaces should be added after an ellipsis if it starts a new text fragment - to indicate the continuation of some previous statement.
Correct: ...word... word. word, word! word? word: word; word... e.g.: tel./fax 1410-07-15, 9:08, etc.
Incorrect: ... word ... word , word ! word,word word :word...word ... word. . . word... . e. g. : tel. / fax 1410- 07- 15 , 9: 08, etc.. - Brackets and quotation marks. The content inside brackets should never be separated from them by spaces (this applies both to the opening and closing brackets)! A space should always be placed before opening brackets. Usually, it is also added after closing brackets. The exception is when a basic punctuation mark appears directly after the bracket - in this case, no space is added between them. This applies to quotation marks as well.
Correct: word (content) word "content" word (content), word "content"! word - (...) - ("content!") "content" (etc.).
Incorrect: word ( content ) word( content )word word( content ) word " content " , word "content" ? -( ... )-"content"( "content! " ) (etc. ) . - Hyphen (dash) - it should be typed with spaces on both sides. An exception is connectors that are part of compound words (e.g.: "e-mail"), phone numbers, postal codes, etc. - in these cases, they are not separated by spaces.
Correct: This is - as old writings say - correct. 99-999 e-mail
Incorrect: This is- as old writings say-incorrect. 99 - 999 e - mail - Mathematical operators ("+", "-", "*", "/" "=") are usually typed with spaces on both sides. An exception is the plus and minus signs, which don't indicate a mathematical operation but the sign of a number - in this case, no space is added after them. Additionally, a parenthesis in function names should not be preceded by a space.
Correct: f(x, y) = -2x + 3y + 4
Incorrect: f (x,y)= - 2 x+ 3 y+4
I know that the comments presented here may amuse some of you (especially the first part). Be tolerant of those who are not experienced. Remember if you have ever come across a website that was teeming with annoying errors. What can you think of such a site then? I hope that participants in this course will never have that experience.
Questions and Answers
How to put text on a website?
To add plain text to a website, simply type it in the HTML document's body - that is, within the <body>...</body> section - using any HTML editor.
How to add text to a page?
To add plain text to an existing web page, open the chosen *.html file in an HTML editor. Then, find the location in the document where the new text should be added - it should be somewhere inside the <body>...</body> section. You can simply type or paste the text from the system clipboard using the keyboard shortcut Ctrl+V (on Windows). Finally, save the modified *.html file using the keyboard shortcut Ctrl+S.
Tags
What are HTML tags?
Aside from regular text on a page, you can introduce tags (also known as markup). A tag is a special text enclosed in angle brackets, for example: <b>. It is part of the HTML language syntax and allows you to control the appearance of the page. Thanks to it, you can, for example, set the background color, apply text formatting, insert an image or a table, and so on. The tag is not visible on the screen. Only the effects of its operation are visible (e.g., inserting an image). To make the <b> tag above visible, I had to use a little "trick" (if you can't wait and want to know what it is right now, take a look at the page: Special Characters).
Because the characters: "<" (less-than sign) and ">" (greater-than sign) are reserved for tags, they should not appear in normal page content. If you need to use them, you should enter them as: < and > respectively. Additionally, the "&" (ampersand) should be replaced with: &
There are opening tags (e.g., <b>) and closing tags (e.g., </b>). Notice that the closing tag begins with a slash (the "/" character) and has the same name as the opening tag. Between the opening and closing tags, you can place some text that you want to format (in this case, it will be text in bold), for example:
<b>This text will be bold.</b>or
<b>
This text will be bold.
</b>
(both of the above methods are equivalent).
The opening tag must always appear before the closing tag. This is quite a logical rule, as you can't close doors that haven't been opened yet, and you can't open doors that aren't closed... unless we're talking about revolving doors ;-) It's also important to remember that almost every tag (with a few exceptions) must be closed with the appropriate closing tag, which means you can't forget to insert closing tags!
In HTML, it doesn't matter what letters we use for tags; for example, the <html> tag can be written like this: <hTmL>. However, you'll agree that the second way is not very readable. That's why in this course, all tags will be written in lowercase.
Practically every HTML editor offers:
- Syntax highlighting, which means that if you enter a valid tag, its syntax will be displayed in a specific color, depending on the program's settings. This immediately highlights all errors, typically simple typos. This is probably the most important advantage of using HTML editors. This is why it is not recommended to use regular text editors for creating web pages.
- Automatic closing of tags, which involves the program automatically adding the appropriate closing tag right after the user provides the opening tag. This speeds up work significantly, and you won't forget to close tags because the program does it for you automatically.
- Generators (or wizards) help with creating various tags (through special dialog boxes).
Questions and Answers
What are tags?
A tag is a special text enclosed in angle brackets. It is a part of the HTML language syntax and allows you to control the appearance of a webpage. There are opening and closing tags. At the beginning of a closing tag, there is always a forward slash character "/".
What are tags used for?
HTML tags are used for formatting text and inserting additional elements on a webpage.
How to insert special characters in HTML?
Because the characters: "<" (less than sign) and ">" (greater than sign) are reserved for tags, they should not appear in the normal content of a webpage. If you need to use them, you should enter them as follows: < and >.
Line break
How do you move text to the next line in an HTML document?
<br>
The above tag (<br>) is used when we want to immediately end a line. You may ask: Why use it? Can't we simply press Enter and move the text cursor to the next line? Well, you can't. Web browsers ignore all line break characters entered with the Enter key (they also ignore placing more than one space next to each other - see: Special Characters). For example, if you enter the following text in an editor:
This is the first line...
and this is the second line.
in the browser, you'll see:
This is first line... and this is second line.The line will only end automatically when the provided text is too long to fit in a single line. However, if you want to immediately end a line, you can do so by placing the <br> tag where you want the line to end. For example, entering the following in an editor:
This is the first line...<br>
and this is the second line.
will result in displaying the text as:
This is the first line...and this is the second line.
If you place more than one <br> tag next to each other, you can "go down" several lines, for example:
This is the first line...<br><br><br>
...and this is the next line.
will display:
This is the first line......and this is the next line.
Note that the <br> tag itself is not visible on the browser screen. Only the effects of its operation, i.e., ending the line, are visible.
The <br> tag in HTML does not have a closing tag (this is one of the few exceptions)!
Questions and Answers
How to end a line in HTML?
In the HTML language, pressing the Enter key will not cause the text to be displayed on a new line. To do that, you should use the <br> tag.
How to move to the next line in HTML?
Place the <br> tag where you want to end a line of text.
How to move text down in HTML?
To move text down by one line in HTML, insert the <br> tag before it.
How to put text below text in HTML?
To stack two lines of text one below the other, place the <br> tag between them.
Paragraph
How to arrange text on the screen? How to add a new paragraph? How to center or align text? What are HTML attributes?
<p>Enter paragraph text here</p>
Paragraph (sometimes called a paragraph) is a section of text. Paragraphs are separated by a blank line. The content of a paragraph should be placed between the <p> and </p> tags. It is common practice to enclose most of the regular text on a web page within paragraphs. A single paragraph represents a section of text that is thematically different from the previous one. Instead of using two line break tags <br><br>, you can simply wrap the desired text in a paragraph. The result will be the same, and the browser will display such text more effectively. This makes the page look more aesthetically pleasing and makes it easier to find relevant information on it.
Paragraph (paragrah) is crucial in HTML syntax because it allows you to format text on the screen in a specific way. This is done by providing tag attributes. Attributes are always placed inside the opening tag, immediately after its name (separated from it by a space), and before the closing angle bracket, i.e., ">". Each tag has specific attributes that it supports. For a paragraph, you can use the following attributes, among others:
- Text alignment to the left (default)
<p style="text-align: left">Enter paragraph text here</p>
or simply<p>Enter paragraph text here</p>
- Text alignment to the right
<p style="text-align: right">Enter paragraph text here</p>
- Centered text
<p style="text-align: center">Enter paragraph text here</p>
- Justified text (aligns to both margins at once)
<p style="text-align: justify">Enter paragraph text here</p>
In all cases, highlighted are the tag attributes along with their values (attribute values are enclosed in double quotes after the equal sign).
Replace the text: Enter paragraph text here with the text you want to format as specified by the parameter.
Example <p {text-align}>
style="text-align: left",
left alignment,
left alignment (style="text-align: left"),
(style="text-align: left")...
style="text-align: right",
right alignment,
right alignment (style="text-align: right"),
(style="text-align: right")...
style="text-align: center",
centered,
centered (style="text-align: center"),
(style="text-align: center")...
justified, aligns to both margins at once (style="text-align: justify"); justified, aligns to both margins at once (style="text-align: justify"); justified, aligns to both margins at once (style="text-align: justify"); justified, aligns to both margins at once (style="text-align: justify"); justified, aligns to both margins at once (style="text-align: justify"); justified, aligns to both margins at once (style="text-align: justify"); justified, aligns to both margins at once (style="text-align: justify"); justified, aligns to both margins at once (style="text-align: justify"); justified, aligns to both margins at once (style="text-align: justify"); justified, aligns to both margins at once (style="text-align: justify")...
Questions and Answers
How to create a paragraph in HTML?
To do this, place the text inside the <p>...</p> tag.
What is a paragraph in HTML?
A paragraph is another term for a paragraph - a visually and thematically distinct part of a longer text. This term is usually used in relation to legal regulations rather than regular text.
How to center text?
To align text in the center, you can add the appropriate attribute to the paragraph tag: <p style="text-align: center">...</p>.
How to justify text in HTML?
To align text to both margins simultaneously, you should add the appropriate attribute to the paragraph tag: <p style="text-align: justify">...</p>.
How to make text align to the right in HTML?
To align text to the right margin, you can add the appropriate attribute to the paragraph tag: <p style="text-align: right">...</p>.
Bold
How do I bold (embolden) text on a Web page?
<b>Enter text here</b>
This tag allows you to make part of the text bold. The text inside the tag will appear in a bold font. A similar function is typically available in regular text editors (e.g., WordPad) when creating a standard text document.
Example <b>
This text is boldQuestions and Answers
How to make text bold?
To make text bold in HTML, simply enclose it within the <b>...</b> tag.
How to change the thickness of HTML text?
By default, text on a web page is written in a regular font. To make a portion of the text bold, just enclose it within the <b>...</b> tag, making it visually stand out.
Italic
How to italicize text on a web page (italics)?
<i>Enter text here</i>
Allows you to write text in italics.
Example <i>
This text is written in italics.Questions and Answers
How to make text italic in HTML?
To write text in italics in HTML - meaning with slanted or cursive font - simply enclose it within the <i>...</i> tags.
How to italicize text in HTML?
By default, text on a web page is written in a regular font. To italicize a portion of the text, just enclose it within the <i>...</i> tags. This is often used to indicate a technical term, idiom from another language, or a quoted text fragment.
Underline
How do you underline text on a Web page?
<u>Enter text here</u>
Allows you to underline a portion of the text.
Example <u>
This text is underlinedQuestions and Answers
How to underline text in HTML?
To underline text in HTML, simply enclose it within the <u>...</u> tags.
How to add underlining in HTML?
By default, text on a web page is written in a regular font. To add underlining to a portion of the text, just enclose it within the <u>...</u> tags. This is often used to indicate unarticulated text or a spelling error.
Font size
How do I change the font size on a web page?
<span style="font-size: size">Enter text here</span>
- xx-small
- Smallest font size
- x-small
- Very small font size
- small
- Small font size
- medium
- Medium font size
- large
- Large font size
- x-large
- Very large font size
- xx-large
- Largest font size
Example {font-size}
Font size is xx-smallFont size is x-small
Font size is small (default)
Font size is medium
Font size is large
Font size is x-large
Font size is xx-large
Questions and Answers
How to change the font size in HTML?
To do this, you need to enclose the text within a tag with an attribute set to an appropriate value: <span style="font-size: xx-small">...</span> (smallest font), <span style="font-size: x-small">...</span> (very small font), <span style="font-size: small">...</span> (small font), <span style="font-size: medium">...</span> (medium font), <span style="font-size: large">...</span> (large font), <span style="font-size: x-large">...</span> (very large font), <span style="font-size: xx-large">...</span> (largest font).
How to reduce the font size in HTML?
Regular text on a webpage is displayed in the default font size. To decrease it, you should enclose it within a tag with an attribute set to an appropriate value: <span style="font-size: x-small">...</span>, or if you want to significantly reduce the text size: <span style="font-size: xx-small">...</span>.
Font color
How do I change the font color on a web page?
<span style="color: color">Enter text here</span>
| black | |
| white | |
| silver | |
| gray | |
| maroon | |
| red | |
| purple | |
| fuchsia | |
| green | |
| lime | |
| olive | |
| yellow | |
| navy | |
| blue | |
| teal | |
| aqua |
If you need more than these sixteen colors, you can visit the following website: Colors.
HTML editors often have a special color picker to easily choose a color of any shade.
Example {color}
After entering the following HTML code in an HTML editor:
<span style="color: red">This text is written in red font</span>
you will see the following on your browser screen:
This text is written in red fontQuestions and Answers
How to change the font color in HTML?
To do this, you need to enclose the text within a tag with an attribute set to an appropriate value: <span style="color: black">...</span> (black), <span style="color: white">...</span> (white), <span style="color: silver">...</span> (silver), <span style="color: gray">...</span> (gray), <span style="color: maroon">...</span> (maroon), <span style="color: red">...</span> (red), <span style="color: purple">...</span> (purple), <span style="color: fuchsia">...</span> (fuchsia), <span style="color: green">...</span> (green), <span style="color: lime">...</span> (lime), <span style="color: olive">...</span> (olive), <span style="color: yellow">...</span> (yellow), <span style="color: navy">...</span> (navy), <span style="color: blue">...</span> (blue), <span style="color: teal">...</span> (teal), <span style="color: aqua">...</span> (aqua).
How to use colors in HTML?
One of the most common ways to use colors on web pages is by changing the text color. By default, all text will be written in black or, occasionally, white when a dark theme is set in the operating system or web browser. To change the text color to something else, you just need to enclose it within a tag with an attribute set to an appropriate value. For example: <span style="color: red">...</span> will change the text color to red.
Font family
How do I change the font type on a Web page?
<span style="font-family: font">Enter text here</span>or
<span style="font-family: font1, font2, font3, ...">Enter text here</span>
You can enter additional font names separated by commas instead of dots (remove the dots themselves).
Attention! Be cautious when using this command because if the user viewing your page does not have the specified font on their operating system, the text will be displayed in the default font (in Windows, most likely 'Times New Roman', although this is not certain). Additionally, not every font can correctly display diactitic characters from any language. Make sure to test the result in practice!
In the case of the second command, the font that the user has as the first in their list will be used. This is a better approach as it allows for a fallback in case the user does not have one of the specified fonts.
In Windows, the following fonts should be standardly available: 'Times New Roman', Arial, 'Courier New'. Additionally, as of some time ago, Internet Explorer came with: Verdana, Tahoma, 'Trebuchet MS', Georgia - so even now they are still commonly available. When defining fonts, it's a good idea to use these fonts and those that are default in other operating systems (e.g., Helvetica - similar to Arial).
Example {font-family}
Arial Font'Courier New' Font
'Times New Roman' Font
Verdana Font
Questions and Answers
What are the types of fonts?
The most popular types of fonts include: 'Times New Roman', Arial, 'Courier New', Verdana, Tahoma, 'Trebuchet MS', Georgia, Helvetica.
How to change the font family in HTML?
To do this, you need to enclose the text within a tag with an attribute set to an appropriate value - for example: <span style="font-family: Arial">...</span>, <span style="font-family: 'Courier New'">...</span>, <span style="font-family: 'Times New Roman'">...</span>, <span style="font-family: Verdana">...</span>.
Combining parameters
How do you change the appearance of text on a web page?
All of the above parameters (attributes and tags) related to text can be combined. For example, if you input the following in an editor:
<p style="text-align: center"><span style="font-size: large; color: red"><b><i><u>
This is some text
</u></i></b></span></p>
You will get:
This is some text
Notice that you should close the tags in the reverse order in which you opened them. This means you first close the tag that was opened last (in our example, it's <u>), and finally, close the tag that was opened first (in this case, <p>).
Additionally, the values of the style="..." attribute related to the same tag (in our example, it's the <span> tag) can be combined by listing them one after another, separated by semicolons (in our example, the values are: "font-size: large; color: red"). The order of entering both attribute values and tags (opening tags) is arbitrary.
Questions and Answers
How to make text bold and italic in HTML?
How to change the font size and color in HTML?
To do this, you need to enclose the text within a tag with attributes set to appropriate values. For example: <span style="font-size: large; color: red">...</span> will set a very large font size and a red text color.
Background and text color
How do I change the background color and text color on a web page?
<body style="background-color: background color; color: text color">
Here is the actual content of the page
</body>
If you want to set the background color and text color for the entire page, you can use additional attributes for the <body> tag. These values ("background-color: ...; color: ...") are not entered within the actual content of the page, as with tags. Instead, they are placed in the style="..." attribute inside the opening <body> tag (before the actual content) because they are not separate tags but attribute values. It's essential to remember that there can be only one <body> tag on a page. All attributes related to it (like the one shown above) are added to the existing tag, rather than inserting a new one in a different part of the page.
The background color and text color of the entire page should always be set simultaneously.
Even if you set the text color for the entire page, you can later change it locally using the <span style="color: color">...</span> command (see: Font Color).
Questions and Answers
How to change the background color and text color in HTML?
To change the default background color and text color for the entire page, it's best to add the appropriate attributes to the tag of the document's body. For example: <body style="background-color: black; color: white">...</body> will set a black background color and white text color. However, it's essential to remember that in an HTML file (e.g., *.html), there can be only one document body tag. Therefore, you add the relevant attribute to the existing tag rather than inserting a new one!
How to make a yellow background in HTML?
The background color on a web page should always be set together with a text color that provides adequate contrast. Otherwise, the user may change the default text color in their web browser, and it could become unreadable (e.g., white text on a yellow background). To set a yellow background and black text for the entire page, it's best to add the appropriate attributes to the tag of the document's body: <body style="background-color: yellow; color: black">...</body>. However, it's essential to remember that in an HTML file (e.g., *.html), there can be only one document body tag. Therefore, you add the relevant attribute to the existing tag rather than inserting a new one!
Inserting image
How do I insert an image (graphic, photo) into a Web page?
<img src="Provide relative path to the image" alt="Provide alternative text">
As for "Provide alternative text", enter a brief description that will appear if the image cannot be displayed (e.g., if the user disables image display in their web browser).
WARNING!
The <img> tag does not have a closing tag in HTML!
Example <img>

Access path
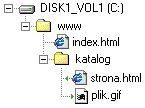
Below, you will find examples of correct access paths for various directory structures on your disk. In all cases, our intention is to insert an image named plik.gif into the document strona.html - the "path" is marked in green with arrows. When building the path, we always start from strona.html and aim to reach plik.gif. The file index.html serves as the main page, which we are not concerned with here.
- Correct: plik.gif
Incorrect: C:\www\plik.gif, plik.GIF, plik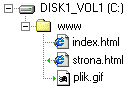
As you can see, the image plik.gif and the document strona.html are in the same directory. It doesn't matter whether both files are in the main directory of the website or in a subdirectory - the access path is the same. In this case, just provide the file name without any additions. This is the simplest directory structure (especially the first example - everything in one directory). It is used, particularly in websites consisting of a few subpages. If you have trouble creating more complex access paths, I recommend using this model, as the chance of making a mistake is minimal.
- Correct: katalog/plik.gif
Incorrect: C:\www\katalog\plik.gif, katalog\plik.gif, katalog/plik.GIF, katalog/plik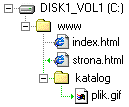
If plik.gif is in a subdirectory, and the document strona.html is not, you need to specify the name of the subdirectory before the file name, followed by a forward slash ("/"). This structure is used, for example, when you have many files (e.g., images) and want to keep them organized in a separate subdirectory.
- Correct: ../plik.gif
Incorrect: C:\www\plik.gif, katalog/plik.gif, ../plik.GIF, ../plik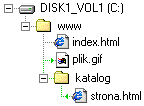
Similar to the previous case, but now plik.gif is in the main directory, and strona.html is in a subdirectory. In this case, you need to prepend ../, which means "go up" to the parent directory, from katalog/ to www/. This structure is useful when you have multiple sections on the website, each consisting of many subpages placed in separate directories.
- Correct: ../katalog2/katalog2a/plik.gif
Incorrect: C:\www\katalog2\katalog2a\plik.gif, katalog2/katalog2a/plik.gif, ../katalog2/katalog2a/plik.GIF, ../katalog2/katalog2a/plik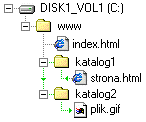
This is a slightly modified version of the previous case. Now, both plik.gif and strona.html are in separate subdirectories, but they are two different directories. You begin by building the path in the katalog1a/, where your strona.html is located. Then, you go up to the parent directory, which is done by adding ../ at the beginning of the access path. Now you can freely enter the second subdirectory, katalog2/ (by specifying its name), where your plik.gif is located, and at the end, as always, provide the file name. This structure is useful when you have multiple sections on the website and many files. In this case, the main directory usually contains only the homepage index.html, and all subpages and files are placed in subdirectories.
- Correct: ../../katalog2/katalog2a/plik.gif
Incorrect: C:\www\katalog2\katalog2a\plik.gif, katalog2/katalog2a/plik.gif, ../katalog2/katalog2a/plik.gif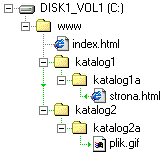
This example is quite advanced. If you understand this, you can say that you have "access paths at your fingertips"! We are "located" in the katalog1a/ (as our page where we want to insert an image is here). The first two dots in the access path make you go up one level - to the katalog1/. The next two dots correspond to going up one more level, which means to the www/. Now you can enter the subdirectory katalog2/ (by specifying its name) and then the subdirectory katalog2a/, which is inside it. Finally, at the end of the path, as always, you provide the file name.
The above methods of specifying the access path apply to all types of files, including subpages. A common mistake made by beginners is using an absolute access path, for example:
C:\www\katalog2\katalog2a\plik.gif (ERROR!)This is a serious mistake! After you upload the page to the internet, it is saved on the server's computer (not yours). The structure (look) of the directory tree there will undoubtedly be different from your local disk. Therefore, an absolute path does not exist there. Even worse, you may not detect the error immediately because the image will load correctly on your computer, but others won't see it! Also, note that in the paths, we use forward slashes ("/\ There is another type of serious error: Both paths may seem correct, but they are absolutely unacceptable! You must not insert files from a different disk. Furthermore, you should not refer to files that are "above" the main website directory - in our case, it's www/ (you can recognize the main website directory by the fact that the main page index.html is directly inside it). Remember: always use relative, not absolute access paths! Use regular slashes, not backslashes. All files of your website should be within the main website directory, never above it! Some HTML editors offer automatic insertion of relative access paths (after saving the page to the disk) by selecting the file in a special selector. This makes it much easier to create complex access paths. By the way, I want to point out that the homepage index.html (see above) must be located in the main public directory on the server. When you upload your site to the internet, you send all the files located in the www/ directory, but not the directory itself. index.html must absolutely be in the main directory on your web hosting account; otherwise, your site won't display at all! When uploading your site to the internet, don't forget to copy all image files to the server as well! If you don't follow these recommendations, you may find that after uploading the site to the internet, some files do not load (even if everything is fine on your computer)! Finally, one more piece of advice: images inserted on a web page significantly increase its file size, which, in turn, prolongs the page loading time. If your local copy of the page loads lightning-fast on your computer, don't assume it will be the same after you put it on the internet. Of course, the larger the image, the more disk space it occupies. Moreover, too much unthought-of graphics only distracts from the content. So, try not to overdo it. It's also essential to make sure that all images are saved in one of the following three formats: Under no circumstances should you use the BMP format because it has no or very poor compression, resulting in significantly larger file sizes for images saved in this format. You can find useful graphics for websites directly on the internet. Many online services for webmasters offer ready-made menu buttons and other useful add-ons for free. All you need to do is a bit of searching. For example, if the file is named "image.jpg" and it's in the same directory on your computer as the HTML document you want to insert the image into, you can use the following tag: The most common reasons for images not displaying on a web page are typos in the image file names or incorrectly constructed access paths. Another reason may be omitting the file extension. Even though some operating systems (e.g., Windows) may hide file name extensions, you should always provide it when inserting an image on a web page. Images may also fail to display due to the use of forbidden characters in the file name, such as diacritical Polish characters or spaces. It's also recommended not to use uppercase letters. How do I determine the alignment of an image (graphic, photo) on a Web page? To align an image to the left side of the text in HTML, you need to add an attribute with the appropriate value to its tag: To align an image to the right side of the text in HTML, you need to add an attribute with the appropriate value to its tag: How do I position an image (graphic, photo) or other elements in the center of the screen (centering)? This command allows you to center the image, positioning it in the center of the screen. The easiest way to place an image in the center of a web page is to insert it inside a tag with an attribute set to the appropriate value: To center both the image and text in HTML, you can place both of them inside a tag with an attribute set to the appropriate value: What are links (hyperlinks, hypertext links) used for? (within the same website) Practically every website includes links (also called references or hyperlinks). Most often, a special, highlighted piece of text (or an image) serves as a link, and when you click on it, you are taken to another page. Just as every book is divided into chapters, websites typically consist of subpages. Each subpage is a separate HTML file (with the extension *.html or *.htm) and its content is usually thematically different from the others (it's created in the same way as the main page). This organization makes it easier for users to navigate and prevents unnecessary loading of the entire website at once (which would probably take a very long time). Placing everything in one file (index.html) is not recommended (unless your site is really short)! To allow users to move freely between subpages of our website, they need to be connected in some way. You should place links to all subpages in a chosen location, typically on a separate page, which serves as a table of contents and contains links to all subpages of the site. The syntax of a link to a subpage (within the same website) is as follows: With this type of link, you can refer to any file located on an FTP account with the website. This allows you to build a download section, i.e., links for downloading files. To see an example of how this type of link works, you can click here (it will take you to the main page of this course). An online link is also called a hyperlink, hypertext reference, or more informally, a link. Clicking on it automatically takes you to a new page it points to. For example, if the file of the subpage is named "contact.html" and it's located in the same folder on your computer's disk as the *.html document in which you want to insert the link, you can use the following tag: The most common reason for a non-functional link on a website is typographical errors in the file name of the link's subpage or an incorrectly constructed path [see: Inserting an Image]. Another reason might be omitting the file extension, either *.html or *.htm. Although in some operating systems (e.g., Windows) file extensions may be hidden, when inserting a link to a subpage, you always need to specify it. The link might not work if the file name of the subpage includes forbidden characters, such as diacritical Polish letters or spaces. It is also recommended not to use capital letters. If the link doesn't work at all, it might be due to a typographical error in the tag name or attribute - it should be written correctly, for example: How to insert a link (hyperlink, hypertext link) in a Web page? (across the entire Internet) Users can also be directed to other people's websites, not just their own, and this does not in any way violate copyright (unless you sign it as the author of that page ;-)). On the contrary, it is free advertising for the page to which the reference is made. The syntax of a link to a web address (across the entire Internet) is as follows: The web address must always begin with http:// or https:// This type of link is useful if you want to include so-called links to any websites across the entire Internet on your site. When surfing the web, if you come across an interesting page, you can copy its address (from the browser's address bar) and place it in a link. Thanks to this, all users visiting our website will be able to go directly to the indicated page without having to type its address. To see an example of how this type of link works, you can click here (it will take you to the home page of the google.com search engine). For example, to insert a link to Google, you should use the following code: Probably, at the beginning of the link's address, "https://" or "http://" is missing. It should look like this, for example: To do this, you need to add a special attribute to the link tag: How to insert an email address on a web page? This link is useful when you want to include the address of your email inbox (email) on the page. This way, you will be in constant contact with internet users visiting your website. Remember that providing your address on a website may result in receiving unwanted messages - spam. A good idea may be to create a free email account on any internet portal and provide the address of such an account on your website - you can always change the free account. When creating a website on a free server, you often get an email account. You can use it then. As an example of using such a link, you can send me an email. Just please, if you don't have anything specific to write, don't send me empty emails ;-) To do this, you need to place a link tag on the page with an attribute that contains the email address preceded by "mailto:". For example, if you want to insert a link to the address "john_doe@example.com", you should use the following code: Usually, the reason is the lack of the "mailto:" text before the email address in the link. It should be, for example: How to insert an image (graphic) link (hyperlink, hypertext reference), i.e. a clickable button, on a Web page? All links presented so far have been in text form. If you want to include image buttons in your website's menu, you should use the following command: As you can see, image links can be used in combination with any type of links (subpage, web address, or email). However, they are most commonly used to create navigation menus for websites (subpage links). It's best to save button images in the GIF format. If you lack artistic skills, you don't have to draw all the graphics yourself. You can find many websites on the Internet where you can download ready-made buttons for free. Click on this button: The easiest way to place an image link on a page is to insert an image inside the link tag. Image links can be created for all types of links: to a subpage, to a web address, and for email links. For example, if the image file is named "image.jpg" and is located in the same directory on your computer's disk as the *.html document where you want to insert the image link, you can use the following tags accordingly: Hyperlink, also known as a link or simply a hypertext link, is a link that can contain not only plain text but also an image, and even both an image and its text caption simultaneously. This means the link will work whether the user clicks directly on the image or its caption. For example: What to avoid so that your Web site does not scare away Internet users? Finally, I would like to address a very important matter that many people seem to forget. A basic knowledge of HTML is sufficient to create a webpage, but to create a good website that will be frequently visited and something to be truly proud of, you need something more: Below you will find a list of the most frequently asked questions from this chapter with concise answers and ready-to-use HTML code examples. To check a more detailed description, click the "See more..." link. below the selected answer. HTML is short for Hypertext Markup Language. It is a computer language used to create web pages. An HTML document is a text file in which you enter all the commands for text formatting, inserting graphics, and more. To edit HTML pages, it's best to use a specialized editor. There are many free and paid HTML editors available for different operating systems: Windows, Linux, Mac OS X. For writing HTML code, it's best to use a dedicated editor. There are many free and paid HTML editors available for different operating systems. For example: Pajączek, CoreEditor, Bluefish, Brackets, PSPad, gedit, Kate, Quanta Plus, SCREEM, Smultron. Brackets is one of the best HTML editors. It has a range of built-in features useful for creating web pages. It supports installing free extensions that can further enhance its capabilities. It is completely free and available in versions for every operating system. Many text editors, such as Microsoft Word, Open Office, or Libre Office, have the ability to convert a document to HTML code. To do this, simply use the menu: "File / Save As..." and then, in the "Save as type" field, choose "Web Page, Filtered (*.htm;*.html)" or "HTML Document (Writer) (*.html)" as appropriate. Finally, click the "Save" button. However, it should be noted that documents created in this way may take a long time to load and display incorrectly in some browsers, and they may be difficult to modify later. Therefore, it is recommended to use dedicated HTML editors for creating this type of documents. Text editors such as Microsoft Word, Open Office, or Libre Office allow you to directly open and edit HTML files. To do this, select the menu: "File / Open" and then locate the *.html or *.htm document on your disk and click the "Open" button. However, it's important to remember that modifying an HTML document in this way may result in longer loading times and incorrect display in some browsers. Therefore, it's recommended to use dedicated HTML editors for creating this type of documents. An HTML document consists of a header section An HTML document consists of a header section To ensure correct display of diacritic characters, you should insert a character set declaration in the document's header: Websites typically consist of multiple subpages. To create a subpage, open any HTML editor and create a new file in the same way you would when creating the main page of the website. Then, input the appropriate content and save the file on your disk with the extension *.html or *.htm. There are two ways to open an HTML file in a web browser. The first method is to use the appropriate keyboard shortcut in the web browser (in Windows, it would be Ctrl+O), and then, in the dialog box, locate the file on your disk and click the "Open" button. The second method is to locate the HTML file on your disk using the built-in file explorer in the operating system, and then double-click its name - this will open the file in the default web browser. To add plain text to a website, simply type it in the HTML document's body - that is, within the To add plain text to an existing web page, open the chosen *.html file in an HTML editor. Then, find the location in the document where the new text should be added - it should be somewhere inside the A tag is a special text enclosed in angle brackets. It is a part of the HTML language syntax and allows you to control the appearance of a webpage. There are opening and closing tags. At the beginning of a closing tag, there is always a forward slash character "/". HTML tags are used for formatting text and inserting additional elements on a webpage. Because the characters: "<" (less than sign) and ">" (greater than sign) are reserved for tags, they should not appear in the normal content of a webpage. If you need to use them, you should enter them as follows: < and >. In the HTML language, pressing the Enter key will not cause the text to be displayed on a new line. To do that, you should use the Place the To move text down by one line in HTML, insert the To stack two lines of text one below the other, place the To do this, place the text inside the A paragraph is another term for a paragraph - a visually and thematically distinct part of a longer text. This term is usually used in relation to legal regulations rather than regular text. To align text in the center, you can add the appropriate attribute to the paragraph tag: To align text to both margins simultaneously, you should add the appropriate attribute to the paragraph tag: To align text to the right margin, you can add the appropriate attribute to the paragraph tag: To make text bold in HTML, simply enclose it within the By default, text on a web page is written in a regular font. To make a portion of the text bold, just enclose it within the To write text in italics in HTML - meaning with slanted or cursive font - simply enclose it within the By default, text on a web page is written in a regular font. To italicize a portion of the text, just enclose it within the To underline text in HTML, simply enclose it within the By default, text on a web page is written in a regular font. To add underlining to a portion of the text, just enclose it within the To do this, you need to enclose the text within a tag with an attribute set to an appropriate value: Regular text on a webpage is displayed in the default font size. To decrease it, you should enclose it within a tag with an attribute set to an appropriate value: To do this, you need to enclose the text within a tag with an attribute set to an appropriate value: One of the most common ways to use colors on web pages is by changing the text color. By default, all text will be written in black or, occasionally, white when a dark theme is set in the operating system or web browser. To change the text color to something else, you just need to enclose it within a tag with an attribute set to an appropriate value. For example: The most popular types of fonts include: 'Times New Roman', Arial, 'Courier New', Verdana, Tahoma, 'Trebuchet MS', Georgia, Helvetica. To do this, you need to enclose the text within a tag with an attribute set to an appropriate value - for example: To do this, you need to enclose the text within a tag with attributes set to appropriate values. For example: To change the default background color and text color for the entire page, it's best to add the appropriate attributes to the tag of the document's body. For example: The background color on a web page should always be set together with a text color that provides adequate contrast. Otherwise, the user may change the default text color in their web browser, and it could become unreadable (e.g., white text on a yellow background). To set a yellow background and black text for the entire page, it's best to add the appropriate attributes to the tag of the document's body: For example, if the file is named "image.jpg" and it's in the same directory on your computer as the HTML document you want to insert the image into, you can use the following tag: The most common reasons for images not displaying on a web page are typos in the image file names or incorrectly constructed access paths. Another reason may be omitting the file extension. Even though some operating systems (e.g., Windows) may hide file name extensions, you should always provide it when inserting an image on a web page. Images may also fail to display due to the use of forbidden characters in the file name, such as diacritical Polish characters or spaces. It's also recommended not to use uppercase letters. To align an image to the left side of the text in HTML, you need to add an attribute with the appropriate value to its tag: To align an image to the right side of the text in HTML, you need to add an attribute with the appropriate value to its tag: The easiest way to place an image in the center of a web page is to insert it inside a tag with an attribute set to the appropriate value: To center both the image and text in HTML, you can place both of them inside a tag with an attribute set to the appropriate value: An online link is also called a hyperlink, hypertext reference, or more informally, a link. Clicking on it automatically takes you to a new page it points to. For example, if the file of the subpage is named "contact.html" and it's located in the same folder on your computer's disk as the *.html document in which you want to insert the link, you can use the following tag: The most common reason for a non-functional link on a website is typographical errors in the file name of the link's subpage or an incorrectly constructed path [see: Inserting an Image]. Another reason might be omitting the file extension, either *.html or *.htm. Although in some operating systems (e.g., Windows) file extensions may be hidden, when inserting a link to a subpage, you always need to specify it. The link might not work if the file name of the subpage includes forbidden characters, such as diacritical Polish letters or spaces. It is also recommended not to use capital letters. If the link doesn't work at all, it might be due to a typographical error in the tag name or attribute - it should be written correctly, for example: For example, to insert a link to Google, you should use the following code: Probably, at the beginning of the link's address, "https://" or "http://" is missing. It should look like this, for example: To do this, you need to add a special attribute to the link tag: To do this, you need to place a link tag on the page with an attribute that contains the email address preceded by "mailto:". For example, if you want to insert a link to the address "john_doe@example.com", you should use the following code: Usually, the reason is the lack of the "mailto:" text before the email address in the link. It should be, for example: The easiest way to place an image link on a page is to insert an image inside the link tag. Image links can be created for all types of links: to a subpage, to a web address, and for email links. For example, if the image file is named "image.jpg" and is located in the same directory on your computer's disk as the *.html document where you want to insert the image link, you can use the following tags accordingly: Hyperlink, also known as a link or simply a hypertext link, is a link that can contain not only plain text but also an image, and even both an image and its text caption simultaneously. This means the link will work whether the user clicks directly on the image or its caption. For example: See if you remember what the following HTML source code snippets are responsible for. If in doubt, click the "See more..." link. under the selected group of examples. Theory without practice is nothing. That's why I encourage you to constantly experiment with HTML code while reading the course. This way, the information you've learned will be better retained in your memory. Moreover, often it's only during practical exercises that we realize we haven't fully understood the theory. But most importantly, practice is what makes us better in a given field. This, in turn, stimulates and develops our passion, allowing us to become true masters - "practice makes perfect." So, don't neglect this stage of learning. Install an HTML editor and start practicing systematically. As part of developing your practical skills, I recommend doing a series of exercises. These exercises will involve creating a simple webpage based on the information you've learned. In the following chapters, we will gradually expand this webpage, so don't forget to save it on your computer. At this stage, publishing the page on the internet is not yet necessary. If you plan to use information from the internet for your webpage, remember to respect copyright laws! You can't always freely copy any text to your site without the author's permission. Each quotation should be clearly marked with its source. When it comes to photos and graphics, it's essential to remember to respect copyright laws! You can't freely copy every image to your webpage without the author's permission.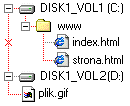
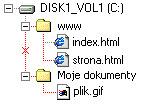
Very important: it's better not to use the following in file names:Image formats
Questions and Answers
How to Insert an Image in HTML?
<img src="image.jpg" alt="Enter a brief description of the image here">. The text "Enter a brief description of the image here" won't normally appear on the page, but it's recommended not to omit it. It may be displayed if, for some reason, the browser can't display the image. It's also helpful for blind users who typically use special screen readers to access web pages.Why Is My Image Not Displaying in HTML?
Image alignment
<img src="Enter the relative path to the image here" alt="Enter alternative text here" style="float: alignment">
Example <img {float}>
style="float: left", style="float: left", style="float: left", style="float: left", style="float: left",
style="float: left", style="float: left", style="float: left", style="float: left", style="float: left",
style="float: left", style="float: left", style="float: left", style="float: left", style="float: left",
style="float: left", style="float: left", style="float: left", style="float: left", style="float: left",
style="float: left", style="float: left", style="float: left", style="float: left", style="float: left",
style="float: left", style="float: left", style="float: left", style="float: left", style="float: left",
style="float: left", style="float: left", style="float: left", style="float: left", style="float: left",
style="float: left", style="float: left", style="float: left", style="float: left", style="float: left",
style="float: left", style="float: left", style="float: left", style="float: left", style="float: left"...
style="float: right", style="float: right", style="float: right", style="float: right", style="float: right",
style="float: right", style="float: right", style="float: right", style="float: right", style="float: right",
style="float: right", style="float: right", style="float: right", style="float: right", style="float: right",
style="float: right", style="float: right", style="float: right", style="float: right", style="float: right",
style="float: right", style="float: right", style="float: right", style="float: right", style="float: right",
style="float: right", style="float: right", style="float: right", style="float: right", style="float: right",
style="float: right", style="float: right", style="float: right", style="float: right", style="float: right",
style="float: right", style="float: right", style="float: right", style="float: right", style="float: right",
style="float: right", style="float: right", style="float: right", style="float: right", style="float: right"...Questions and Answers
How to Move an Image to the Left in HTML?
<img src="image.jpg" alt="Enter a brief image description here" style="float: left">.How to Insert an Image on the Right in HTML?
<img src="image.jpg" alt="Enter a brief image description here" style="float: right">.Centering image
<div style="text-align: center"><img src="Enter the relative path to the image here" alt="Enter alternative text here"></div>
Example {text-align: center} <img>
Questions and Answers
How to Center an Image in HTML?
<div style="text-align: center"><img src="image.jpg" alt="Enter a brief image description here"></div>.How to Center an Image and Text in HTML?
<div style="text-align: center"><img src="image.jpg" alt="Enter a brief image description here"><br> Enter the caption for the image here</div>. It's a good practice to insert a line break between the image and the text. Otherwise, if the image is too narrow, the first line of text might appear next to the image, rather than below it.Subpage link
<a href="relative path to the subpage">link description</a>
Instead of "link description", you should enter a short text that will appear on the screen and, when clicked, will lead to the specified subpage (the address of the page is only visible in the browser's status bar).Example <a href>
Questions and Answers
What is an online link called?
How to Create a Link to an HTML Subpage?
<a href="contact.html">...</a>.Why Doesn't the Link Work?
<a href="subpage.html">...</a>.Web address link
<a href="web address">link description</a>
Instead of "web address", you should enter the address of the place on the Internet where you want to go (e.g., https://www.google.com).Example <a https>
Questions and Answers
How to Create a Link to a Website?
<a href="https://www.google.com/">Go to Google</a>.Why Doesn't the Internet Link Work?
<a href="https://www.google.com/">Go to Google</a>. A less common reason may be using "https://" when the linked page only supports "http://". The first type is safer for the user because it provides an encrypted connection, but if it doesn't work, you need to use the second type.How to Open a Link in a New HTML Tab?
<a target="_blank" href="https://www.google.com/">Open Google in a new window</a>.Email link
<a href="mailto:email address">link description</a>
Example <a mailto>
Questions and Answers
How to Insert an Email Address in HTML?
<a href="mailto:john_doe@example.com">...</a>.Why Doesn't the Email Link Work?
<a href="mailto:john_doe@example.com">...</a>.Image link
<a href="address"><img src="Specify the relative path to the image" alt="Specify alternative text here" style="border: 0"></a>
Instead of "Specify the relative path to the image", provide the location on your disk where the desired image is located. For "Specify alternative text here", input a brief description that will appear in case the image fails to load.Example <a href, img>

Questions and Answers
How to make an image a link?
<a href="subpage.html"><img src="image.jpg" alt="Go to subpage" style="border: 0"></a> (subpage link), <a href="https://www.google.com/"><img src="image.jpg" alt="Go to Google" style="border: 0"></a> (web address link), <a href="mailto:contact@example.com"><img src="image.jpg" alt="Contact" style="border: 0"></a> (email link).How to add a hyperlink to an image?
<a href="large-image.jpg"><img src="small-image.jpg" alt="View large image" style="border: 0"><br> Enter the image caption here</a>.How to make good website
<header style="text-align: center">You can place the site's logo here</header>
<nav style="width: 300px; float: left; overflow: hidden">
Here, you place links to the table of contents
</nav>
<article style="margin-left: 320px">

Here, you input the page's content

</article>
<footer style="text-align: center; clear: both">You can place the site's footer here</footer>
and you will get:Questions and answers
Which HTML editor to choose: Pajączek, CoreEditor, Bluefish, Brackets, PSPad, gedit, Kate, Quanta Plus, SCREEM, Smultron?
What is HTML and what is it used for?
How to edit a page in HTML?
Which program to use for writing HTML code?
Which HTML editor?
How to convert text to HTML?
How to open an HTML file in Word?
What does a typical HTML document look like? What are subpages?
What is the structure of an HTML document?
<head>...</head> and the actual body of the document <body>...</body>. In the header, you can include the title and description of the page. The body of the document contains text and other elements that will be displayed in the browser window.What sections make up an HTML document?
<head>...</head> and the body of the document <body>...</body>.How to set diacritic characters in HTML?
<meta charset="utf-8">. Additionally, it is necessary to use the appropriate HTML editor.How to create subpages in HTML?
How to open an HTML file in a browser?
How do you enter text on Web pages? What are the rules for correct typing of punctuation marks in computer text?
How to put text on a website?
<body>...</body> section - using any HTML editor.How to add text to a page?
<body>...</body> section. You can simply type or paste the text from the system clipboard using the keyboard shortcut Ctrl+V (on Windows). Finally, save the modified *.html file using the keyboard shortcut Ctrl+S.What are HTML tags?
What are tags?
What are tags used for?
How to insert special characters in HTML?
How do you move text to the next line in an HTML document?
How to end a line in HTML?
<br> tag.How to move to the next line in HTML?
<br> tag where you want to end a line of text.How to move text down in HTML?
<br> tag before it.How to put text below text in HTML?
<br> tag between them.How to arrange text on the screen? How to add a new paragraph? How to center or align text? What are HTML attributes?
How to create a paragraph in HTML?
<p>...</p> tag.What is a paragraph in HTML?
How to center text?
<p style="text-align: center">...</p>.How to justify text in HTML?
<p style="text-align: justify">...</p>.How to make text align to the right in HTML?
<p style="text-align: right">...</p>.How do I bold (embolden) text on a Web page?
How to make text bold?
<b>...</b> tag.How to change the thickness of HTML text?
<b>...</b> tag, making it visually stand out.How to italicize text on a web page (italics)?
How to make text italic in HTML?
<i>...</i> tags.How to italicize text in HTML?
<i>...</i> tags. This is often used to indicate a technical term, idiom from another language, or a quoted text fragment.How do you underline text on a Web page?
How to underline text in HTML?
<u>...</u> tags.How to add underlining in HTML?
<u>...</u> tags. This is often used to indicate unarticulated text or a spelling error.How do I change the font size on a web page?
How to change the font size in HTML?
<span style="font-size: xx-small">...</span> (smallest font), <span style="font-size: x-small">...</span> (very small font), <span style="font-size: small">...</span> (small font), <span style="font-size: medium">...</span> (medium font), <span style="font-size: large">...</span> (large font), <span style="font-size: x-large">...</span> (very large font), <span style="font-size: xx-large">...</span> (largest font).How to reduce the font size in HTML?
<span style="font-size: x-small">...</span>, or if you want to significantly reduce the text size: <span style="font-size: xx-small">...</span>.How do I change the font color on a web page?
How to change the font color in HTML?
<span style="color: black">...</span> (black), <span style="color: white">...</span> (white), <span style="color: silver">...</span> (silver), <span style="color: gray">...</span> (gray), <span style="color: maroon">...</span> (maroon), <span style="color: red">...</span> (red), <span style="color: purple">...</span> (purple), <span style="color: fuchsia">...</span> (fuchsia), <span style="color: green">...</span> (green), <span style="color: lime">...</span> (lime), <span style="color: olive">...</span> (olive), <span style="color: yellow">...</span> (yellow), <span style="color: navy">...</span> (navy), <span style="color: blue">...</span> (blue), <span style="color: teal">...</span> (teal), <span style="color: aqua">...</span> (aqua).How to use colors in HTML?
<span style="color: red">...</span> will change the text color to red.How do I change the font type on a Web page?
What are the types of fonts?
How to change the font family in HTML?
<span style="font-family: Arial">...</span>, <span style="font-family: 'Courier New'">...</span>, <span style="font-family: 'Times New Roman'">...</span>, <span style="font-family: Verdana">...</span>.How do you change the appearance of text on a web page?
How to make text bold and italic in HTML?
How to change the font size and color in HTML?
<span style="font-size: large; color: red">...</span> will set a very large font size and a red text color.How do I change the background color and text color on a web page?
How to change the background color and text color in HTML?
<body style="background-color: black; color: white">...</body> will set a black background color and white text color. However, it's essential to remember that in an HTML file (e.g., *.html), there can be only one document body tag. Therefore, you add the relevant attribute to the existing tag rather than inserting a new one!How to make a yellow background in HTML?
<body style="background-color: yellow; color: black">...</body>. However, it's essential to remember that in an HTML file (e.g., *.html), there can be only one document body tag. Therefore, you add the relevant attribute to the existing tag rather than inserting a new one!How do I insert an image (graphic, photo) into a Web page?
How to Insert an Image in HTML?
<img src="image.jpg" alt="Enter a brief description of the image here">. The text "Enter a brief description of the image here" won't normally appear on the page, but it's recommended not to omit it. It may be displayed if, for some reason, the browser can't display the image. It's also helpful for blind users who typically use special screen readers to access web pages.Why Is My Image Not Displaying in HTML?
How do I determine the alignment of an image (graphic, photo) on a Web page?
How to Move an Image to the Left in HTML?
<img src="image.jpg" alt="Enter a brief image description here" style="float: left">.How to Insert an Image on the Right in HTML?
<img src="image.jpg" alt="Enter a brief image description here" style="float: right">.How do I position an image (graphic, photo) or other elements in the center of the screen (centering)?
How to Center an Image in HTML?
<div style="text-align: center"><img src="image.jpg" alt="Enter a brief image description here"></div>.How to Center an Image and Text in HTML?
<div style="text-align: center"><img src="image.jpg" alt="Enter a brief image description here"><br> Enter the caption for the image here</div>. It's a good practice to insert a line break between the image and the text. Otherwise, if the image is too narrow, the first line of text might appear next to the image, rather than below it.What are links (hyperlinks, hypertext links) used for?
What is an online link called?
How to Create a Link to an HTML Subpage?
<a href="contact.html">...</a>.Why Doesn't the Link Work?
<a href="subpage.html">...</a>.How to insert a link (hyperlink, hypertext link) in a Web page?
How to Create a Link to a Website?
<a href="https://www.google.com/">Go to Google</a>.Why Doesn't the Internet Link Work?
<a href="https://www.google.com/">Go to Google</a>. A less common reason may be using "https://" when the linked page only supports "http://". The first type is safer for the user because it provides an encrypted connection, but if it doesn't work, you need to use the second type.How to Open a Link in a New HTML Tab?
<a target="_blank" href="https://www.google.com/">Open Google in a new window</a>.How to insert an email address on a web page?
How to Insert an Email Address in HTML?
<a href="mailto:john_doe@example.com">...</a>.Why Doesn't the Email Link Work?
<a href="mailto:john_doe@example.com">...</a>.How to insert an image (graphic) link (hyperlink, hypertext reference), i.e. a clickable button, on a Web page?
How to make an image a link?
<a href="subpage.html"><img src="image.jpg" alt="Go to subpage" style="border: 0"></a> (subpage link), <a href="https://www.google.com/"><img src="image.jpg" alt="Go to Google" style="border: 0"></a> (web address link), <a href="mailto:contact@example.com"><img src="image.jpg" alt="Contact" style="border: 0"></a> (email link).How to add a hyperlink to an image?
<a href="large-image.jpg"><img src="small-image.jpg" alt="View large image" style="border: 0"><br> Enter the image caption here</a>.Revision
How do you move text to the next line in an HTML document?
<br>
How to arrange text on the screen? How to add a new paragraph? How to center or align text? What are HTML attributes?
<p>Enter paragraph text here</p>
<p style="text-align: left">Enter paragraph text here</p>
<p>Enter paragraph text here</p>
<p style="text-align: right">Enter paragraph text here</p>
<p style="text-align: center">Enter paragraph text here</p>
<p style="text-align: justify">Enter paragraph text here</p>
How do I bold (embolden) text on a Web page?
<b>Enter text here</b>
How to italicize text on a web page (italics)?
<i>Enter text here</i>
How do you underline text on a Web page?
<u>Enter text here</u>
How do I change the font size on a web page?
<span style="font-size: size">Enter text here</span>
How do I change the font color on a web page?
<span style="color: color">Enter text here</span>
How do I change the font type on a Web page?
<span style="font-family: font">Enter text here</span>
<span style="font-family: font1, font2, font3, ...">Enter text here</span>
How do I change the background color and text color on a web page?
<body style="background-color: background color; color: text color">
Here is the actual content of the page
</body>
How do I insert an image (graphic, photo) into a Web page?
<img src="Provide relative path to the image" alt="Provide alternative text">
How do I determine the alignment of an image (graphic, photo) on a Web page?
<img src="Enter the relative path to the image here" alt="Enter alternative text here" style="float: alignment">
How do I position an image (graphic, photo) or other elements in the center of the screen (centering)?
<div style="text-align: center"><img src="Enter the relative path to the image here" alt="Enter alternative text here"></div>
What are links (hyperlinks, hypertext links) used for?
<a href="relative path to the subpage">link description</a>
How to insert a link (hyperlink, hypertext link) in a Web page?
<a href="web address">link description</a>
How to insert an email address on a web page?
<a href="mailto:email address">link description</a>
How to insert an image (graphic) link (hyperlink, hypertext reference), i.e. a clickable button, on a Web page?
<a href="address"><img src="Specify the relative path to the image" alt="Specify alternative text here" style="border: 0"></a>
Tutorial