Inserting image
How do I insert an image (graphic, photo) into a Web page?
<img src="Provide relative path to the image" alt="Provide alternative text">
As for "Provide alternative text", enter a brief description that will appear if the image cannot be displayed (e.g., if the user disables image display in their web browser).
WARNING!
The <img> tag does not have a closing tag in HTML!
Example <img>

Access path
Below, you will find examples of correct access paths for various directory structures on your disk. In all cases, our intention is to insert an image named plik.gif into the document strona.html - the "path" is marked in green with arrows. When building the path, we always start from strona.html and aim to reach plik.gif. The file index.html serves as the main page, which we are not concerned with here.
- Correct: plik.gif
Incorrect: C:\www\plik.gif, plik.GIF, plik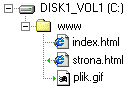
As you can see, the image plik.gif and the document strona.html are in the same directory. It doesn't matter whether both files are in the main directory of the website or in a subdirectory - the access path is the same. In this case, just provide the file name without any additions. This is the simplest directory structure (especially the first example - everything in one directory). It is used, particularly in websites consisting of a few subpages. If you have trouble creating more complex access paths, I recommend using this model, as the chance of making a mistake is minimal.
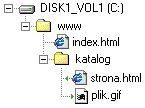
- Correct: katalog/plik.gif
Incorrect: C:\www\katalog\plik.gif, katalog\plik.gif, katalog/plik.GIF, katalog/plik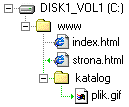
If plik.gif is in a subdirectory, and the document strona.html is not, you need to specify the name of the subdirectory before the file name, followed by a forward slash ("/"). This structure is used, for example, when you have many files (e.g., images) and want to keep them organized in a separate subdirectory.
- Correct: ../plik.gif
Incorrect: C:\www\plik.gif, katalog/plik.gif, ../plik.GIF, ../plik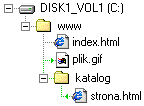
Similar to the previous case, but now plik.gif is in the main directory, and strona.html is in a subdirectory. In this case, you need to prepend ../, which means "go up" to the parent directory, from katalog/ to www/. This structure is useful when you have multiple sections on the website, each consisting of many subpages placed in separate directories.
- Correct: ../katalog2/katalog2a/plik.gif
Incorrect: C:\www\katalog2\katalog2a\plik.gif, katalog2/katalog2a/plik.gif, ../katalog2/katalog2a/plik.GIF, ../katalog2/katalog2a/plik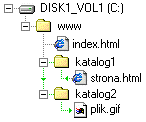
This is a slightly modified version of the previous case. Now, both plik.gif and strona.html are in separate subdirectories, but they are two different directories. You begin by building the path in the katalog1a/, where your strona.html is located. Then, you go up to the parent directory, which is done by adding ../ at the beginning of the access path. Now you can freely enter the second subdirectory, katalog2/ (by specifying its name), where your plik.gif is located, and at the end, as always, provide the file name. This structure is useful when you have multiple sections on the website and many files. In this case, the main directory usually contains only the homepage index.html, and all subpages and files are placed in subdirectories.
- Correct: ../../katalog2/katalog2a/plik.gif
Incorrect: C:\www\katalog2\katalog2a\plik.gif, katalog2/katalog2a/plik.gif, ../katalog2/katalog2a/plik.gif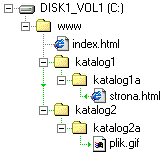
This example is quite advanced. If you understand this, you can say that you have "access paths at your fingertips"! We are "located" in the katalog1a/ (as our page where we want to insert an image is here). The first two dots in the access path make you go up one level - to the katalog1/. The next two dots correspond to going up one more level, which means to the www/. Now you can enter the subdirectory katalog2/ (by specifying its name) and then the subdirectory katalog2a/, which is inside it. Finally, at the end of the path, as always, you provide the file name.
The above methods of specifying the access path apply to all types of files, including subpages. A common mistake made by beginners is using an absolute access path, for example:
C:\www\katalog2\katalog2a\plik.gif (ERROR!)This is a serious mistake! After you upload the page to the internet, it is saved on the server's computer (not yours). The structure (look) of the directory tree there will undoubtedly be different from your local disk. Therefore, an absolute path does not exist there. Even worse, you may not detect the error immediately because the image will load correctly on your computer, but others won't see it! Also, note that in the paths, we use forward slashes ("/\ There is another type of serious error: Both paths may seem correct, but they are absolutely unacceptable! You must not insert files from a different disk. Furthermore, you should not refer to files that are "above" the main website directory - in our case, it's www/ (you can recognize the main website directory by the fact that the main page index.html is directly inside it). Remember: always use relative, not absolute access paths! Use regular slashes, not backslashes. All files of your website should be within the main website directory, never above it! Some HTML editors offer automatic insertion of relative access paths (after saving the page to the disk) by selecting the file in a special selector. This makes it much easier to create complex access paths. By the way, I want to point out that the homepage index.html (see above) must be located in the main public directory on the server. When you upload your site to the internet, you send all the files located in the www/ directory, but not the directory itself. index.html must absolutely be in the main directory on your web hosting account; otherwise, your site won't display at all! When uploading your site to the internet, don't forget to copy all image files to the server as well! If you don't follow these recommendations, you may find that after uploading the site to the internet, some files do not load (even if everything is fine on your computer)! Finally, one more piece of advice: images inserted on a web page significantly increase its file size, which, in turn, prolongs the page loading time. If your local copy of the page loads lightning-fast on your computer, don't assume it will be the same after you put it on the internet. Of course, the larger the image, the more disk space it occupies. Moreover, too much unthought-of graphics only distracts from the content. So, try not to overdo it. It's also essential to make sure that all images are saved in one of the following three formats: Under no circumstances should you use the BMP format because it has no or very poor compression, resulting in significantly larger file sizes for images saved in this format. You can find useful graphics for websites directly on the internet. Many online services for webmasters offer ready-made menu buttons and other useful add-ons for free. All you need to do is a bit of searching. For example, if the file is named "image.jpg" and it's in the same directory on your computer as the HTML document you want to insert the image into, you can use the following tag: The most common reasons for images not displaying on a web page are typos in the image file names or incorrectly constructed access paths. Another reason may be omitting the file extension. Even though some operating systems (e.g., Windows) may hide file name extensions, you should always provide it when inserting an image on a web page. Images may also fail to display due to the use of forbidden characters in the file name, such as diacritical Polish characters or spaces. It's also recommended not to use uppercase letters.
Very important: it's better not to use the following in file names:Image formats
Questions and Answers
How to Insert an Image in HTML?
<img src="image.jpg" alt="Enter a brief description of the image here">. The text "Enter a brief description of the image here" won't normally appear on the page, but it's recommended not to omit it. It may be displayed if, for some reason, the browser can't display the image. It's also helpful for blind users who typically use special screen readers to access web pages.Why Is My Image Not Displaying in HTML?